 For any given task, there are many tools you can use. But few are the right tools.
If you’re in IT, you’ve probably heard the saying “Use the right tool for the job.” In architects’ meetings, this sentence echoes from one corner to the other. In my career, I’ve heard it more times than I can count. And the wisdom behind it has stood the test of time.
Editorial note: I originally wrote this post on Bluemedora’s blog. You can check out the original here, at their site.
That’s because when it comes to how data is stored, it’s not one-tool-fits-all for every type of data.
There’s always the right database for every task. Today, data grows rapidly and often at a fast pace. It comes in all shapes and sizes. This gives rise to questions like
- How flexible is your data storage? Can it adapt to ever-changing business demands?
- How easy is to scale and respond to an increasing workload?
Sometimes these questions lead you to the door of a NoSQL database. In fact, it might lead you to MongoDB.
In this post, you’re going to learn about MongoDB on GCP, including how to set it up and keep it healthy.
Editorial note: I originally wrote this post on Bluemedora’s blog. You can check out the original here, at their site.
What Is MongoDB?
MongoDB is a NoSQL database. It’s completely document-oriented.
For some time, traditional relational databases have been the modus operandi for most organizations.
In a relational database like PostgreSQL, there are tables that have relations to other tables. A single row in the table constitutes a record. The schema is predetermined and well planned before creation.
MongoDB uses a different approach. In MongoDB, everything that constitutes a record is stored as a single JSON object, and MongoDB stores them without conforming to a specific schema. This allows for flexibility—you can store data of any attributes.
So now you know the difference between a relational database and a NoSQL database. But why would you want to run a NoSQL database like MongoDB anyway?
Flexibility
They say data is the heart of every application. When something’s wrong with your data, it will propagate and infect the rest of your application.
Modern applications change frequently during the course of development. Most of the time, it affects the data schema.
The traditional relational database management system lacks the flexibility to easily move with the changes associated with data schema.
Relational databases were built for structured data, where each row has an identical column. But some data are just too ambiguous to be confined to a specific data schema.
With MongoDB, you’re not limited to a specific data schema.
Scalability
Gone are the days when applications were designed to serve a small, finite of set people in one office location. Now, users troop in from every geographical region to use modern applications. You need a database that is easily scalable as you grow.
MongoDB is that database that will help you scale. Database systems with a large data set could be challenging for a server to handle. MongoDB implements sharding, a technique that allows you to scale out your database horizontally by distributing your data and load over multiple servers.
There are even more reasons why MongoDB might just be the right database for your project, but let’s move on to talking about why it works especially well on GCP.
Why MongoDB on Google Cloud Platform?
These days, we see a lot of cloud evangelists preaching that running an on-premise data center is archaic and that you shouldn’t do it.
And yes, you probably know that. But how do you know which cloud provider is suitable for you? Why choose GCP and not other cloud providers?
Here are a few reasons:
- GCP has the most powerful network of all cloud providers. Running MongoDB on Google’s cloud platform means you benefit from the low latency infrastructure Google provides.
- GCP supports live migration—that is, you can migrate your existing VMs from one host to another without downtime.
- Google has security built into its culture. You’ll benefit from all the security practices Google has learned and built in over the years.
With that covered, let’s jump into implementation details!
Implementation Options
When it comes to using MongoDB on Google Cloud’s infrastructure, you have two options:
- Set up MongoDB yourself.
- Use one of the integration options provided by GCP.
We’re going to cover the self-managed route. The next few paragraphs will show you how to set up MongoDB on GCP yourself.
First things first; you need a Google account to use GCP. If you have a Google account, sign in. And if you don’t, create one here.
Choosing the Right Instance Type
First, you need a compute instance to run MongoDB on. But how do you know which instance is right for you?
The answer largely depends on your workload. You should first consider how much data you have, your queries, and the kind of service-level agreements you have with your customers.
Ideally, you want to ensure your choice of instance has enough RAM to support your workload and that it has fast enough persistent storage. Generally, databases do well with fast persistent storage.
For this example, I’m using instance type n1-standard-1 (1 vCPU, 3.75 GB memory) running on Ubuntu 18.00LTS.
Let’s go through the process of creating a new instance.
Creating the Instance
- Go to Compute Engine in GCP and click on Create Instance
- Fill in the details of your instance type and click Create.
 This could take a few seconds—don’t worry if it does.
 - By default, MongoDB listens on port 27017. You want to make sure this port is allowed in your firewall rules for the specific IP addresses you want to grant access to. Mind you, don’t open this port to the entire world. One of the ways to limit access is by creating a new firewall rule in your VPC like this:
 Source IP ranges are the allowed IP addresses of servers to allow access, protocols, and ports.
At this point, you’ve provisioned your instance. The next step is to install MongoDB.
How to Install MongoDB
First, you need to SSH into the Ubuntu instance you created. There are many ways you could do this. One way is to use the SSH from the browser option that GCP provides.
From the command line, run the command below to import the MongoDB public GPG key:
$ wget -qO - https://www.mongodb.org/static/pgp/server-4.0.asc | sudo apt-key add -
Create the file /etc/apt/sources.list.d/mongodb-org-4.0.list using the command below:
$ echo "deb [ arch=amd64 ] https://repo.mongodb.org/apt/ubuntu bionic/mongodb-org/4.0 multiverse" | sudo tee /etc/apt/sources.list.d/mongodb-org-4.0.list
Finally, you can install MongoDB by running this command:
$ sudo apt-get update && sudo apt-get install -y mongodb-org
The command above will take a couple of seconds to complete. And afterward, you should have MongoDB installed.
Now you’ll want to take a moment to verify that MongoDB was installed correctly. To do that, run this command:
$ sudo systemctl status mongod
If everything went fine, you’ll have a screen like this:

At this point, MongoDB is installed but it’s not running. So start the MongoDB with this command:
$ sudo systemctl start mongod
If you check the status again with sudo systemctl status mongod, the status changes to active, as shown here:
Congratulations! You’ve successfully installed a MongoDB instance.
There’s still more to configure, though. In the next section, I’ll show you how to create an administrator account.
Creating an Administrator User
By default, MongoDB doesn’t require authorization to accept connections from the bind IP address (bindIp). This means you can manage MongoDB databases from the bind IP address without authenticating. In later versions of MongoDB, the bindIp value is usually set to 127.0.0.1 (localhost).
This becomes a huge security risk if you change the bind IP address to an IP address accessible from the internet without enabling authorization. Don’t do it!
So, how do you create an administrator account? It’s simple.
First, execute the command below:
$ mongo
You should have a MongoDB shell connection like this:
MongoDB shell version v4.0.12
connecting to: mongodb://127.0.0.1:27017/?gssapiServiceName=mongodb
Implicit session: session { "id" : UUID("a99c1a22-cbc1-4adc-bcd1-2b1b383c5f24") }
MongoDB server version: 4.0.12
Server has startup warnings:
2019-08-10T08:46:14.764+0000 I STORAGE  [initandlisten]
2019-08-10T08:46:14.764+0000 I STORAGE  [initandlisten] ** WARNING: Using the XFS filesystem is strongly recommended with the WiredTiger storage engine
2019-08-10T08:46:14.764+0000 I STORAGE  [initandlisten] **          See http://dochub.mongodb.org/core/prodnotes-filesystem
2019-08-10T08:46:15.873+0000 I CONTROL  [initandlisten]
2019-08-10T08:46:15.873+0000 I CONTROL  [initandlisten] ** WARNING: Access control is not enabled for the database.
2019-08-10T08:46:15.873+0000 I CONTROL  [initandlisten] **          Read and write access to data and configuration is unrestricted.
2019-08-10T08:46:15.873+0000 I CONTROL  [initandlisten]
>
Now, you can execute the command below to create an admin account. Don’t forget to replace AdminUser with your preferred username and strongPassword with a strong password.
use admin
db.createUser(
  {
    user: "AdminUser",
    pwd: "strongPassword",
    roles: [ { role: "userAdminAnyDatabase", db: "admin" } ]
  }
)
If you run the command above, you’ll get an output similar to this:

Type exit and hit ENTER or use CTRL+C to leave the MongoDB shell.
At this point, users are still able to connect to the MongoDB instance without authentication. To enforce authentication, you need to enable security in mongodb.conf.
Open mongodb.conf with Vim, or any editor of your choice, like this:
$ sudo vim /etc/mongodb.conf
Enable authorization under the security configuration option in the file as
...
security:
  authorization: "enabled"
....
There are more options possible. To see those, check out MongoDB’s official documentation on security configuration.
Now, you can save the changes and restart MongoDB with this command:
$ sudo systemctl restart mongod
To confirm that unauthorized connections cannot manage databases, execute this command:
$ mongo
In the shell, run the command show users, as shown here:
$ show users;
You should see a message that says the command usersInfo requires authentication, like this:
2019-08-10T09:41:20.016+0000 E QUERY [js] Error: command usersInfo requires authentication :
Okay. But it’s not the end of the road yet. We’ll need to change the bind IP next.
Changing the Bind IP
Bind IP is a configuration option in MongoDB that prevents it from accepting connections other than the IP addresses set in the bindIp. By default, it’s set to 127.0.0.1.
To let other servers—for example, the application server in the VPC—connect to the MongoDB instance, you need to change the bind IP address in the MongoDB configuration file. Let’s discuss how to do that now.
Open file etc/mongodb.conf with Vim:
$ sudo vim /etc/mongodb.conf
Change the bindIp to the IP address of your servers like this:
...
# network interfaces
net:
  port: 27017
  bindIp: 127.0.0.1,192.198.168.1,192..198.168.2
...
Save the changes and restart MongoDB with the command sudo systemctl restart mongod.
At this point, shouldn’t you test that you can actually connect to MongoDB from the remote host IP addresses you configured above?
The answer is yes, and there are a few ways you can do this. And the next section, I’ll walk you through one of those ways.
Connecting to a Remote MongoDB Instance
We’ll now connect to a remote MongoDB instance.
You can do this using MongoDB clients and drivers. MongoDB has libraries/drivers for major programming languages. You can use these libraries in your code to connect to remote instances. However, for this example, I’ll use a MongoDB client on a Ubuntu machine. You can install it with this command:
sudo apt install mongodb-clients
To connect from this machine (application server) to the remote MongoDB server (database server) you set up earlier, run this command:
mongo -u "YourAdminUserName" -p --authenticationDatabase admin --host 192.198.168.1
Replace YourAdminUserName with your actual username and 192.198.168.1 with your actual MongoDB server IP address. Then, enter your password when prompted.
So far, the MongoDB instance is running. But that doesn’t mean it’s going to keep running forever. How do you make sure the instance is running, healthy, and always available?
Evolving the Architecture
Now, I’ll show you how to keep your instance running and healthy.
At the moment, this what the architecture looks:

This architecture is not the best. If the hardware fails and the database goes offline, your application will fail. Having a single MongoDB instance introduces a single point of failure.
To make this architecture more resilience, you should configure a replica set. A replica set is a set of MongoDB instances that shares the same data content. It contains a primary node and secondary nodes.
A replica set’s primary node is where write operations happen. The secondary nodes replicate data changes from the primary nodes.
A replica set in MongoDB is self-healing. The failover and recovery process is automated. When the primary node fails, a new primary node is elected using the Raft consensus algorithm. This means your database continues to be available, even in time of failure.
If you introduce replication, the new architecture becomes as follows:
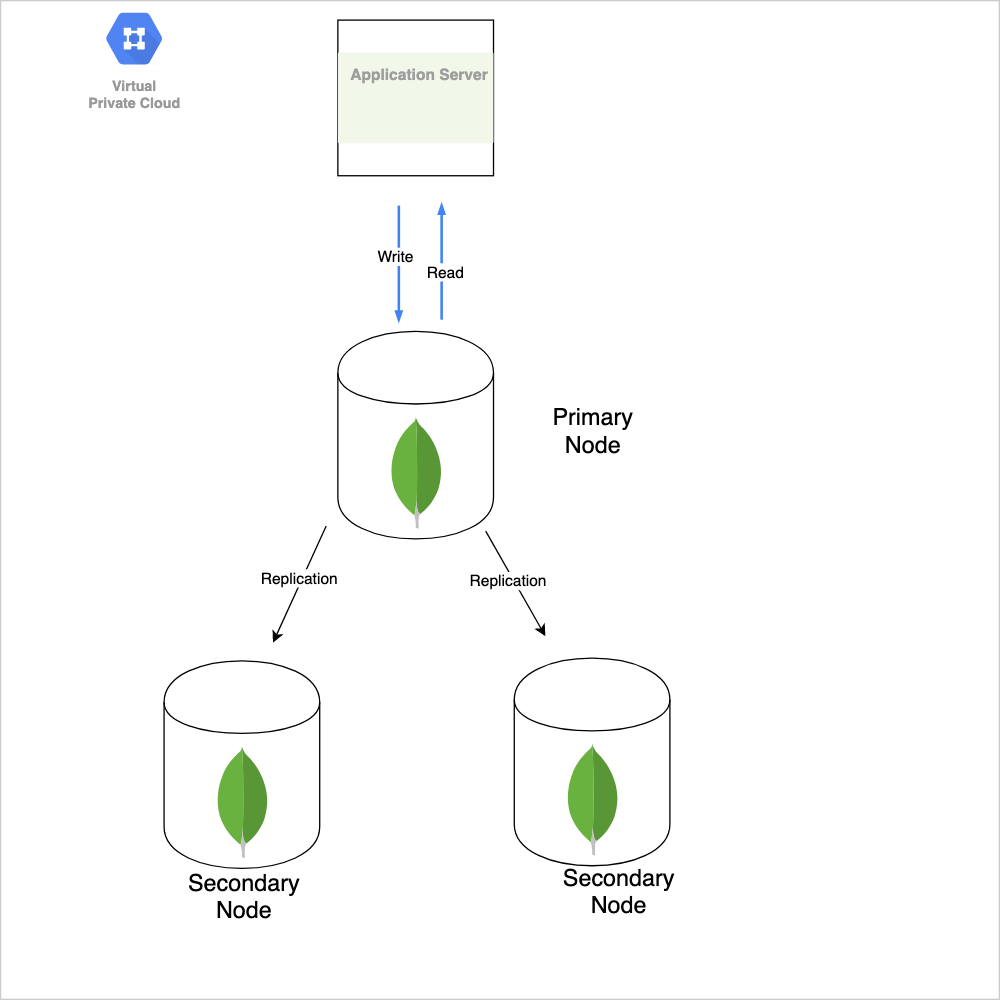
You can improve on this architecture by distributing your replicas across multiple GCP regions such that when a region suffers an outage, you’re not affected.
Now, the question is, “How do you gain visibility into your clusters, monitor performance, and failure?” The answer is simple: monitoring.
Monitoring MongoDB Replicas
MongoDB from version 4 or later offers free cloud monitoring for standalone instances and replica sets. This monitoring includes operation execution times, memory usage, CPU usage, and operation counts.
The free monitoring is not only limited in metrics but also has a retention time of 24 hours. For more information on how to enable free monitoring, check MongoDB’s documentation on monitoring.
If you’re running MongoDB in production, the free monitoring option might not cut it for you. You might want to opt into more advanced, paid services like
Conclusion
In this post, we’ve learned how to deploy MongoDB on Google Cloud Platform using the self-managed route. We also talked about architecting a highly available MongoDB cluster. We touched briefly on monitoring and paid services available for your use. We’ve covered a lot of ground!
To build on this knowledge I recommend you check out MongoDB’s security checklist, MongoDB’s documentation on administration, and Google Cloud’s article on designing robust systems. And remember to always choose the right tool for the job!