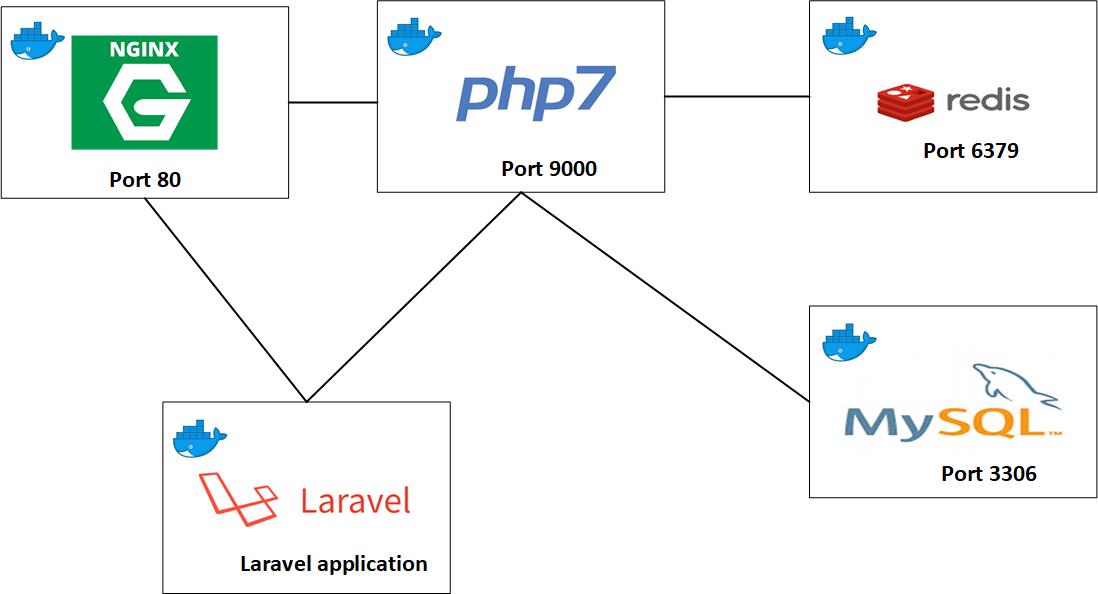
If you are just starting to learn docker, one of the common questions that come to mind is what docker is and why one would need it. In this post, I provide basic answers to some of these questions and finally walk you through composing your first multi-container application with docker-compose.
Table of Contents
- Docker and why
- Docker Image
- Docker compose
- Building multi-container application with docker-compose
- Further Reading
Docker and why?
The definition I love personally about docker is the one provided by the docker team, who defines docker as an open platform for developers and sysadmins to build, ship, and run distributed applications, whether on laptops, data center virtual machines, or the cloud.
Maintaining consistent environments is hard
Without virtualization technologies, applications are not guaranteed to work exactly the same way as they work in one environment. This is mostly due to inconsistent environments and disparity in system libraries.
You could develop your app using python3 only to find out that production environment is running python2. It gets a bit complicated when you cannot upgrade to python3 because other applications on the host need python2 to run.
Developers work their ass off for hours finding solutions to inconsistent environments and yet at most times, their shining code won’t still run because one library file is outdated.
The struggle is endless. I have experienced this agony that comes with troubleshooting a feature that works fine in one environment and not the other. Yeah!, It always works fine on our machines but production - never! :(
Installing application dependencies on local machine takes time
Setting up development environment can be hard without virtualization, we often find ourselves installing different versions of software to support various services we are working on. Maintaining different versions of PHP or MySQL database can take a considerable amount of your time that could be spent writing code.
Containers and virtual machines solve this problem and save you the stress by isolating your application and its dependencies into a single self-contained unit that can reliably run anywhere.
While virtual machines and containers have the same goal, containers are preferred to virtual machines because of their lightweight, speed, and low resource utilization.
A container in this context is similar in function to the one you see on highways: They are both enclosures for holding products. The difference is the content they hold. Ours hold software products.
One of the few popular container providers is Docker and in the next few paragraphs, we’ll be exploring in details how you can dockerize your development environment.
Docker Image
Docker containers are built from docker images. An image is inert and immutable file that is essentially a snapshot of a container. I like to see a docker container as a running instance of docker image.
An image is built from Dockerfile which is basically a text document that contains instructions on how docker should build an image.
Docker compose
Docker-compose is a tool that helps you run complex applications. A working software is never an island, it will most likely depend on a bunch of other things like database, cache and even other services. It’s best practice to have each of these in their respective container. With docker-compose, you can define a multi-container application in a single file which can be spun up in a single command.
Building a multi-container application with docker-compose
Before this post gets unbearably long, let gets our hands dirty. If you don’t have docker and docker-compose installed, go here for install instructions. We’ll compose multiple services for our project. It’s a laravel application and uses MySQL database and Redis for caching.
### Start a new Laravel project
Start a Laravel project by running composer create-project --prefer-dist laravel/laravel laravelApp
If everything works fine, your directories should look like this.

### Create a Dockerfile for the Webserver (Nginx)
We need a web server (nginx) to serve static contents. We create a Dockerfile which is basically a text file that contains instructions of how docker should build our image.
At the project root, we create a web.docker file with the content below.
 # /project/root/web.docker

 # start building image from nginx 1.13
 FROM nginx:1.13

 # copy site.conf from local directory to /etc/nginx/conf.d/default.conf
 ADD ./site.conf /etc/nginx/conf.d/default.conf

 WORKDIR /var/www
site.conf contains vritual host configuration for nginx
At the project root, create site.conf with this content
# /project/root/site.conf

server {
    listen 80;
    index index.php index.html;

    access_log /var/www/storage/logs/access.log;
    error_log /var/www/storage/logs/error.log;
    root /var/www/public;

    location / {
        try_files $uri /index.php?$args;
    }

    location ~ \.php$ {
        fastcgi_split_path_info ^(.+\.php)(/.+)$;
        fastcgi_pass app:9000;
        fastcgi_index index.php;
        include fastcgi_params;
        fastcgi_param SCRIPT_FILENAME $document_root$fastcgi_script_name;
        fastcgi_param PATH_INFO $fastcgi_path_info;
        add_header 'Access-Control-Allow-Origin' '*' always;
        add_header 'Access-Control-Allow-Headers' 'Authorization,DNT,X-Mx-ReqToken,Keep-Alive,User-Agent,X-Requested-With,If-Modified-Since,Cache-Control,Content-Type,api_key' always;
        add_header 'Access-Control-Allow-Methods' 'POST, GET, PUT, DELETE' always;
    }
}
Create a Dockerfile for PHP 7.1
Laravel needs PHP to run as well as some specific PHP extensions. We create a file with the name app.docker which contains the version of PHP and extensions we want.
Create this at the project root as well.
FROM php:7.1.9-fpm

# Install any custom system requirements here
RUN apt-get update && apt-get install -y libmcrypt-dev zip unzip git mysql-client \
    && docker-php-ext-install mcrypt pdo_mysql

WORKDIR /var/www
As for MySQL database and Redis, prebuilt images will suffice for this demonstration. We do not have to customize them.
Define services in Docker-compose file
Now, we create a docker-compose.yml. This should be at the root directory of your project.
version: '2'
services:
 web:
  build:
   context: ./
   dockerfile: web.docker
  container_name: web
  ports:
   - "8080:80"
  volumes:
   - ./:/var/www
  links:
   - app
 app:
  build:
   context: ./
   dockerfile: app.docker
  volumes:
   - ./:/var/www
  depends_on:
   - mysql
   - redis
  environment:
   - "APP_ENV=${APP_ENV}"
   - "APP_DEBUG=${APP_DEBUG}"
   - "APP_KEY=${APP_KEY}"
   - "DB_CONNECTION=${DB_CONNECTION}"
   - "DB_HOST=${DB_HOST}"
   - "DB_PORT=${DB_PORT}"
   - "DB_DATABASE=${DB_DATABASE}"
   - "DB_USERNAME=${DB_USERNAME}"
   - "DB_PASSWORD=${DB_PASSWORD}"
   - "CACHE_DRIVER=${CACHE_DRIVER}"
   - "QUEUE_DRIVER=${QUEUE_DRIVER}"
   - "REDIS_HOST=${REDIS_HOST}"
   - "REDIS_PASSWORD=${REDIS_PASSWORD}"
   - "REDIS_PORT=${REDIS_PORT}"
 mysql:
  image: mysql:5.7
  environment:
   MYSQL_DATABASE: ${DB_DATABASE}
   MYSQL_USER: ${DB_USERNAME}
   MYSQL_PASSWORD: ${DB_PASSWORD}
  volumes:
    - ./mysql:/var/lib/mysql
  ports:
   - "3306:3306"
 redis:
  image: redis:3.0
  ports:
    - "6379:6379"
  volumes:
   - ./redis:/data
Let’s take a moment to understand the content of docker-compose.yml above.
version 2: Version of docker-compose syntax we are using.
services: Services are different pieces of our application i.e (app, redis, mysql).
build: It defines a string which contains the path to the build context and dockerfile argument that references our Dockerfile
container_name: Used to specify the name of the container after built
environment: This is used to pass environment variables to containers.
Note: Docker compose will make variables defined in .env available in service configuration. This means you can automatically access laravel configuration in
.envfile indocker-compose.yml.
image: Used to specify a prebuilt image to start building the container from.
Ports: used to map container’s port to host’s port. In app service, we mapped port 8080 on the host machine to port 80 in the container.
volumes: used to mount container’s directory to host’s directory. In this example, docker will create /var/www directory in app service and point files in your local directory to it. This is useful during development, If you make changes to your source code, the changes are effected immediately.
depends_on: This ensures that mysql and redis are started before app service.
During execution, docker-compose builds a network between the containers such that each containers can refer to each other by using names defined in the docker-compose.yml.
Create a DockerIgnore file
A dockerignore file is similar to gitignore file. With dockerignore file, you specify files and folders that will be excluded from the build and these files will not be copied over to the image.
Let’s create a dockerignore file at root folder with code below
app.docker
web.docker
docker-compose.yml
.env
Build and run project with Compose
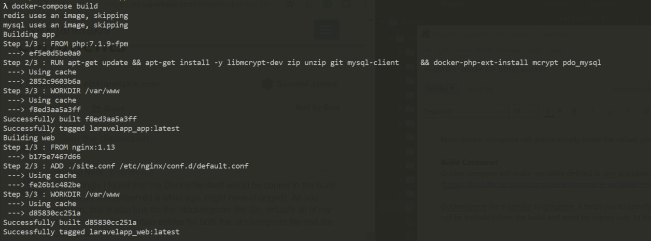
To build the project, we navigate to the project root and run:
docker-compose build
You should see a console output similar to this:

Now, we can proceed to run our services with:
docker-compose up -d
To verify that these services are actually running, we issue docker ps command. This will list all running containers.
 docker ps
CONTAINER ID        IMAGE               COMMAND                  CREATED             STATUS              PORTS                    NAMES
7275af6e2f3f        laravelapp_web      "nginx -g 'daemon of…"   9 seconds ago       Up 6 seconds        0.0.0.0:8080->80/tcp     web
2ce0817bd07e        laravelapp_app      "docker-php-entrypoi…"   10 seconds ago      Up 8 seconds        9000/tcp                 laravelapp_app_1
5a85911e6ecd        mysql:5.7           "docker-entrypoint.s…"   58 seconds ago      Up 11 seconds       0.0.0.0:3306->3306/tcp   laravelapp_mysql_1
41739940ec82        redis:3.0           "docker-entrypoint.s…"   58 seconds ago      Up 10 seconds       0.0.0.0:6379->6379/tcp   laravelapp_redis_1
Finally, point your web browser to http://localhost:8080/ and you should see a default laravel homepage as shown below.
 Since we have already mounted the project’s directory to application container’s directory, changes made to the source code are automatically applied.
## Further Reading Docker cheat sheet Getting started with compose Getting Started With Docker: Key Concepts for Beginners
