
This post is to show you how to run and build a serverless application on Google Cloud Platform that integrates with Google APIs. What we’ll cover in this post includes:
- Creating & deploying a serverless application using the serverless framework.
- Integrating your application with Google APIs using the right authentication mechanism.
We’ll build a simple application that integrates with Google calendar free-busy API.
If you use Gmail or Google mail for business, you already have access to google calendar and its rich APIs.
Google calendar allows you to schedule meetings with people or co-workers, and even specify where the meeting will take place.
The idea is to build an API that allows you to query these venues (calendars or meeting rooms) to see if they are busy or free within the time frame.
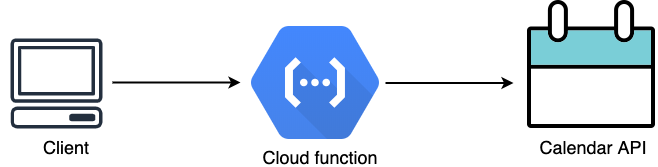
Basically, the client triggers a cloud function on Google Cloud Platform, the service queries google calendar for availability.
You could build a client later that consumes this API then but that we’ll not cover in this post.
To start with the serverless application, you need to create a project on the Google Cloud Platform and enable the following APIs:
-
Google Calendar API
-
Cloud Functions API
-
Cloud Deployment Manager
-
Cloud Storage
-
Stackdriver Logging
Note down the ID of your project, we’ll need it later.
Creating a cloud function
In this section, we’ll create the cloud function using the serverless framework.
The serverless framework is an open-source package that allows you to develop and deploy a serverless application to most cloud platforms like AWS, Azure, Google, and more.
If you do not have the serverless framework installed, you can install it with:
npm install -g serverless
To create the boiler plate for this project using framework CLI, run:
serverless create --template google-nodejs --path /path/to/projectdirectory
The command above generate some files like:
.
├── index.js
├── package.json
└── serverless.yml
Open the serverless.yml file and modify the value of project to match your project’s name on Google Cloud Platform.
 #serverless.yml
  project: your-project-name
Before we write the code for the function, install googleapis package.
npm install googleapis
Let’s write some un-implemented functions responsible for querying Google calendar API.
'use strict';
const { google } = require("googleapis");
const calendars = [{id: 'calender-id-one'}, {id: 'calender-id-two'}]

exports.http = async (request, response) => {};

async function calendarClient()

async function freebusyCheck()
In the code snippet above, calenderClient function will return an instance of authenticated Google calendar client that can be used to construct the query against Google calendar API.
freebusyCheck function contains the logic used in querying google calendar free busy API.
Constant calendars contains an ID of calendars to query.
Let’s implement the calendarClient method as:
async function calendarClient() {
    const auth = new google.auth.GoogleAuth({
        scopes: "https://www.googleapis.com/auth/calendar"
    });

    const authClient = await auth.getClient();

    return google.calendar({
        version: "v3",
        auth: authClient
    });
}
And then we implement the freeBusyCheck method as:
async function freebusyCheck() {
    let timeMin = new Date();
    let timeMax = new Date();
    timeMax = new Date(timeMax.setMinutes(timeMax.getMinutes() + 60)); // free/busy check for the next 1 hour

    const request = {
        resource: {
            timeMin: timeMin.toISOString(),
            timeMax: timeMax.toISOString(),
            items: calendars
        }
    };
    const client = await calendarClient();

    return client.freebusy
        .query(request, "POST")
        .then(response => response.data);
}
The method above should be easy to grasp. We constructed a request object that contains according to the free busy API specifications. We built the start time of the interval of the query indicated by timeMin, the end of the interval of the query denoted by timeMax and a list of calendars to query.
If we put everything together, we’ll have:
'use strict';

const { google } = require("googleapis");
const calendars = [{ id: 'calender-id-one' }, { id: 'calender-id-two' }]

exports.http = (request, response) => {

    let data = await freebusyCheck();
    response.set('Access-Control-Allow-Origin', "*")
    response.set('Access-Control-Allow-Methods', 'GET, POST')
    response.status(200).send(data);

};

async function calendarClient() {
    const auth = new google.auth.GoogleAuth({
        scopes: "https://www.googleapis.com/auth/calendar"
    });

    const authClient = await auth.getClient();

    return google.calendar({
        version: "v3",
        auth: authClient
    });
}

async function freebusyCheck() {
    let timeMin = new Date();
    let timeMax = new Date();
    timeMax = new Date(timeMax.setMinutes(timeMax.getMinutes() + 60));

    const request = {
        resource: {
            timeMin: timeMin.toISOString(),
            timeMax: timeMax.toISOString(),
            items: calendars
        }
    };
    const client = await calendarClient();

    return client.freebusy
        .query(request, "POST")
        .then(response => response.data);
}
Having written the cloudfunction, it’s time to deploy it to Google Cloud Platform.
Deploying to Google Cloud Platform
The serverless framework needs access to your google cloud account to provision resources on your behalf. This means you’ll need to create a service account with a JSON key file that will be used for deployment.
To create a service account with a JSON key file, follow the following steps:
-
Login to your google cloud console and select your project
-
At the left menu, click on “IAM & admin.”
-
Click on service accounts, click “Create service account.”
-
Type in the name you want for the service account and click “create.”
-
The second step is where you select the roles your service account should have, select the following roles
-
- Deployment Manager Editor
- Storage Admin
- Logging Admin
- Cloud Functions Developer
-
Click the “+CREATE KEY” button and select the JSON key type and click the “Create” button.
- Your key will be automatically downloaded.
Now, open up serverless.yml file and update the credentials path so that it points to the absolute path of the key file you just downloaded.
provider:
  name: google
  stage: dev
  runtime: nodejs8
  region: us-central1
  project: my-project-name
  credentials: ~/Path/to/Downloaded/keyfile.json
Now execute, serverless deploy to deploy your function. You’ll get an output similar to this:
.........
Serverless: Done...
Service Information
service: gcf-nodejs
project: calenderapp-262309
stage: dev
region: us-central1

Deployed functions
first
  https://us-central1-calenderapp-262309.cloudfunctions.net/http
Your function is deployed on your GCP. You can trigger the function by accessing the endpoint. Mine is https://us-central1-calenderapp-262309.cloudfunctions.net/http.
At this point, if you make a GET request to this endpoint , you’ll most likely get a response object with an errors like this:
{
	"kind": "calendar#freeBusy",
	"timeMin": "2019-12-19T10:21:16.000Z",
	"timeMax": "2019-12-19T10:51:16.000Z",
	"calendars": {
		"your-calendar-id": {
			"errors": [{
				"domain": "global",
				"reason": "notFound"
			}],
			"busy": []
		}
	}
}
Why? Your application does not have access to the calendar it’s trying to access.
To make this work, you need to allow your project to have access to the calender.
Granting your app permissions to calendar API
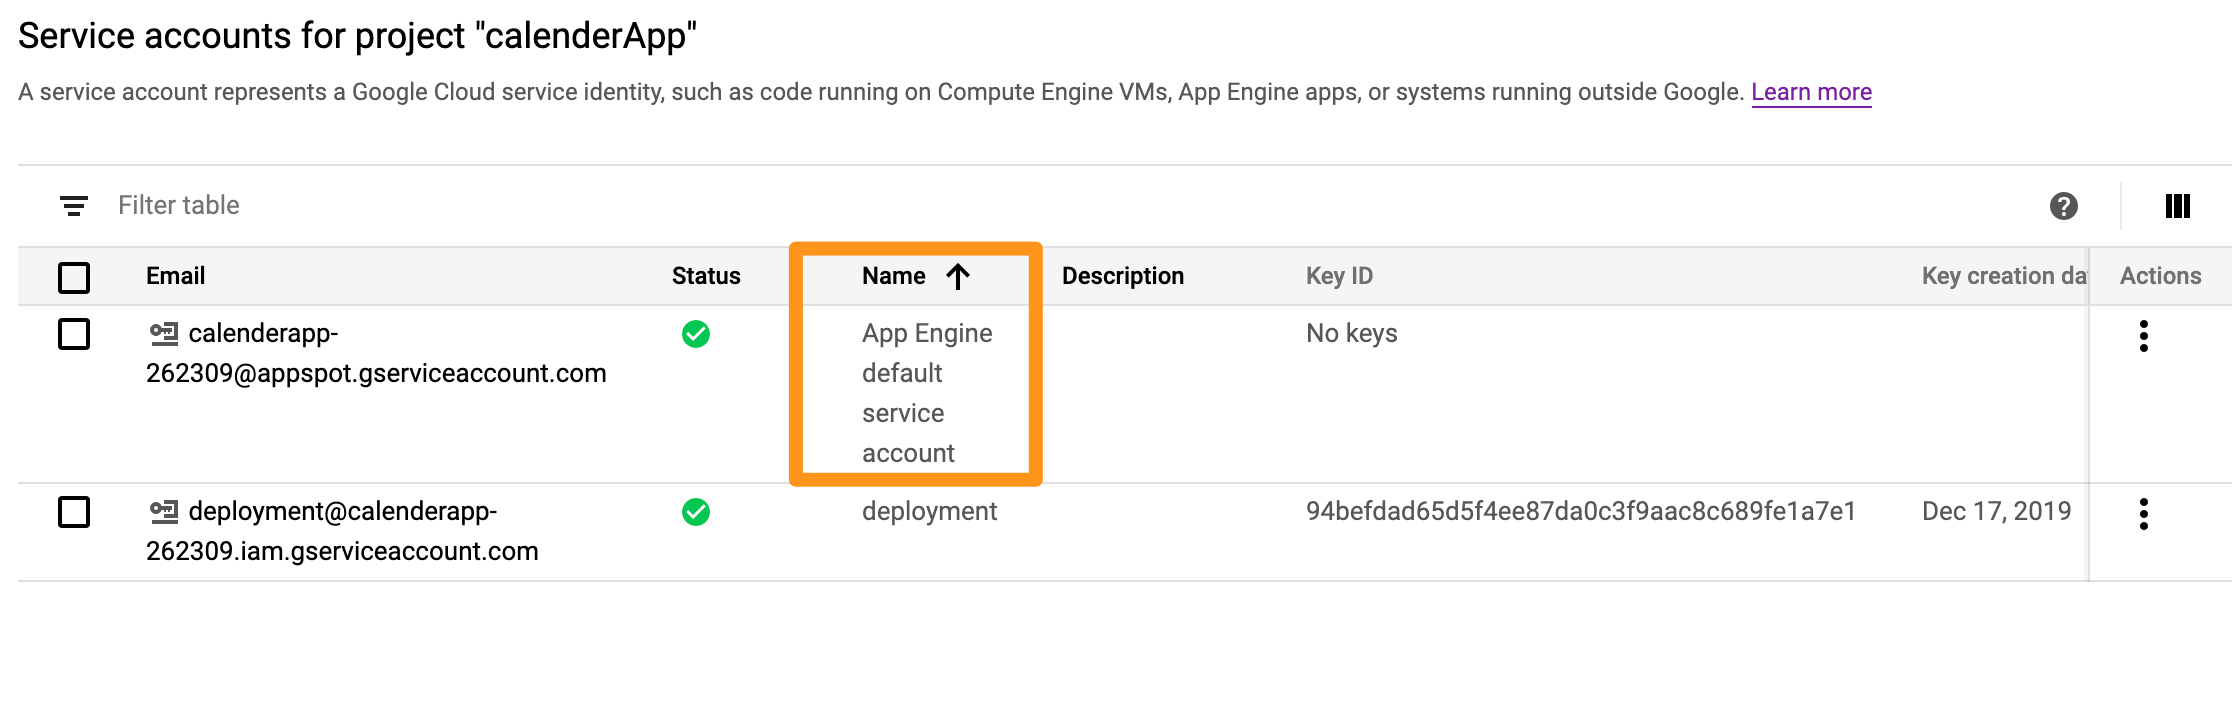
When you create a serverless app on GCP, a default service account is created for your app. This service account is the identity of your application.
To grant your app permissions to a calendar, follow these steps:
In each of the calendar, you need to grant your app permission to view event details:
-
Copy the email address of the App Engine default service account
-
Open the interface of the calendar you want to manage, and click on settings
-
Click on share with some specific people, click on “add people” button
-
Type in the email address and select “see all event details” in the permissions select box
-
Click on “send” to save permission settings.

If your make curl request to the endpoint again, you’ll be able to get the freeBusy information without errors.
{
	"kind": "calendar#freeBusy",
	"timeMin": "2019-12-19T10:50:29.000Z",
	"timeMax": "2019-12-19T11:20:29.000Z",
	"calendars": {
		"your-calendar-id": {
			"busy": []
		}
	}
}
You have learned how to create a serverless application on Google Cloud Platform, you might be interested in how to create a serverless application on AWS as well.
References
- https://developers.google.com/calendar/v3/reference/freebusy
- https://serverless.com/framework/docs